
First created on 2017-03-08
Last updated on 2019-03-03
Applies to Visual Studio 2015 and later. It may work with earlier versions of Visual Studio, but I have not tried them.
DoxyPress is an updated fork of Doxygen. Consider using that instead of Doxygen. It includes a tool for converting Doxygen projects to DoxyPress. See DoxyPress and Visual Studio for information on installing DoxyPress and integrating it with Visual Studio.
Doxygen is a tool for generating documentation from annotated source code. Originally created specifically for C++, it now also supports C, Objective-C, C#, PHP, Java, Python, IDL, Fortran, VHDL, Tcl, and D. Output formats include HTML, Latex, RTF (MS-Word), PostScript, hyperlinked PDF, compressed HTML, and Unix man pages. Although developed in OS X and Linux, there is also an MS Windows executable.
This article will not discuss how to document your source code for use with Doxygen, nor will it list the advantages and disadvantages of using Doxygen. You will have to decide if Doxygen is the right tool for you. You should see the Doxygen website for that. This post will simply show how to use Doxygen with Visual Studio.
Installing Doxygen
There are no extensions for integrating Doxygen with Visual Studio. However, Doxygen, and Doxywizard, a wizard-based executable for creating the configuration file for use with Doxygen, are command line executables which can easily be run from the Visual Studio Tools menu. Adding Doxygen and Doxywizard to the Tools menu is done as follows. The instructions work for both Visual Studio 2015 and Visual Studio 2017.
- Download and install the latest Doxygen Windows binary from the Doxygen downloads page.
- Open the Visual Studio Tools dropdown menu and select External Tools…
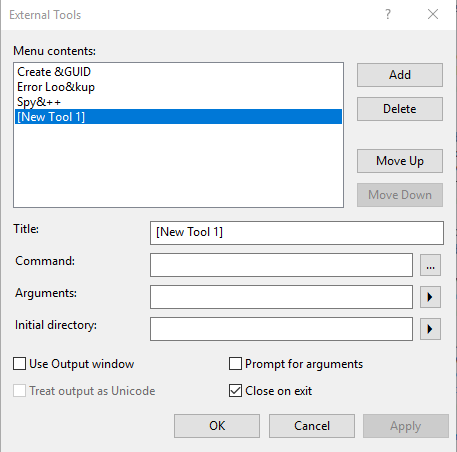
- This opens the External Tools dialog:

- Click the Add button. The dialog changes to this:
- Change the Title to Doxygen, the command to point to the Doxygen executable (C:\Program Files\doxygen\bin\doxygen.exe on my computer), the arguments to $(ProjectDir)\Doxyfile, and initial directory to $(ProjectDir). Check the Use Output window checkbox. The lower portion of the dialog box will look like this:
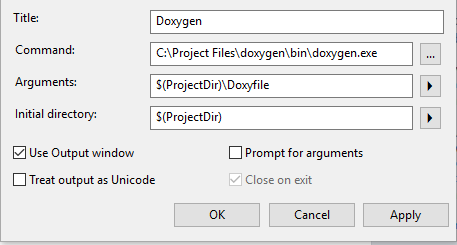 $(ProjectDir) is the macro in Visual Studio that points to the project directory (the directory that contains the project’s vcxproj file).
 - Click the Apply button to add the Doxygen menu item to the Tools menu.
- Click the Add button.
- Enter DoxyWizard as the Title, the location of the doxywizard executable as the Command (e.g. C:\Program Files\doxygen\bin\doxywizard.exe), leave Arguments blank, and $(ProjectDir) as initial directory. Leave all checkboxes unchecked.
- Click the OK button to add the DoxyWizard menu item and close the dialog box.
Running DoxyWizard and Doxygen
The first time you use Doxygen with a project, select the Tools -> DoxyWizard menu item to open the DoxyWizard dialog, shown here:
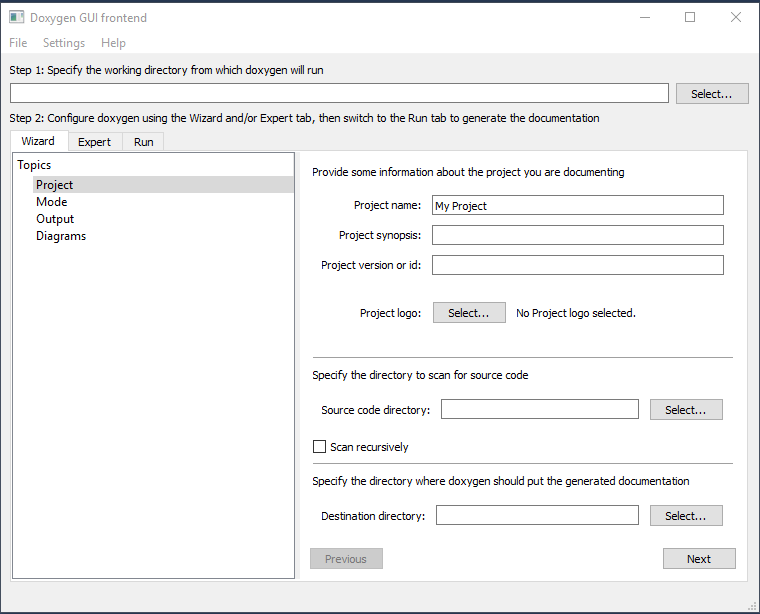
- Set the working directory to be the $(ProjectDir) directory. That is the directory containing the project’s vcxproj file.
- Use the Wizard and/or Expert tabs to set the configuration values.
- Select the Run tab and then Run doxygen.
- If you wish, go back and change the various configuration values.
- Once you are satisfied with the values you have set, close the dialog. This will display the Unsaved changes message box. Click Save to save the configuration. Select the directory that contains the project’s vcxproj file. This will ensure that the configuration file is found when you run Doxygen.
You should only run DoxyWizard once for each project that you are documenting. For each subsequent document generation, use Tools -> Doxygen. Provided you saved the configuration file in the correct location, Doxygen will run correctly, saving its generated documentation to the specified directory, and sending its output to the Visual Studio Output window.
Related Articles
